Reading RPLS is free for the whole profession. Members post, reply, and get the members-only rooms.

Notifications
Clear all
Strictly Surveying
8
Posts
6
Users
0
Reactions
1,012
Views

Topic starter
Translate
▼
English
Spanish
French
German
Italian
Portuguese
Russian
Chinese
Japanese
Korean
Arabic
Hindi
Dutch
Polish
Turkish
Vietnamese
Thai
Swedish
Danish
Finnish
Norwegian
Czech
Hungarian
Romanian
Greek
Hebrew
Indonesian
Malay
Ukrainian
Bulgarian
Croatian
Slovak
Slovenian
Serbian
Lithuanian
Latvian
Estonian
Following the interesting thread "Internal building surveying"
I have also read suggestions here (but they might not be so relevant to us)...
http://www.largeformatphotography.info/forum/archive/index.php/t-115313.html
MightyMoe, post: 377762, member: 700 wrote: I've been very happy that we invested in these for inside buildings:
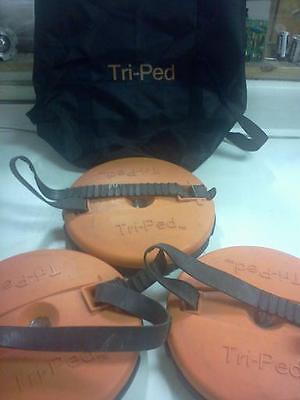
They have been very useful.
Re Tri-Ped
http://www.tri-pedcorp.com/
I like the fact you strap them round the tripod legs to stop lifting. How much do they weigh each?
What do they look like on the underside?
Posted : June 19, 2016 5:43 am

Translate
▼
English
Spanish
French
German
Italian
Portuguese
Russian
Chinese
Japanese
Korean
Arabic
Hindi
Dutch
Polish
Turkish
Vietnamese
Thai
Swedish
Danish
Finnish
Norwegian
Czech
Hungarian
Romanian
Greek
Hebrew
Indonesian
Malay
Ukrainian
Bulgarian
Croatian
Slovak
Slovenian
Serbian
Lithuanian
Latvian
Estonian
Scraps of carpet has been the norm for me, you have to find the right scrap to get good floor to scrap grip. I have done both independent scraps and one triangle piece with a hole cut center for plummet. If slip is a concern the typical fix is to make a triangle out of lath to contain the legs which works better than the Mercedes style chain if memory serves, it has been a while since I have worked in a delicate area.
For asphalt on hot days a wedge of wood to distribute weight and prevent sinking, often with a sandbag wrapped over the foot as well.
For wind either sandbags on the feet, or rebar through the legs and one sandbag suspended or more rebar. Lo-inc sells special weights for the feet which are tubes to be filled with lead shot, I have never used em.
I like the look of the Tri-Ped as well, would like it better if it had a hole to anchor the disc to the ground with a fastener for use when wind or bumping is the threat rather than damage to floor.
Posted : June 19, 2016 9:28 am

Translate
▼
English
Spanish
French
German
Italian
Portuguese
Russian
Chinese
Japanese
Korean
Arabic
Hindi
Dutch
Polish
Turkish
Vietnamese
Thai
Swedish
Danish
Finnish
Norwegian
Czech
Hungarian
Romanian
Greek
Hebrew
Indonesian
Malay
Ukrainian
Bulgarian
Croatian
Slovak
Slovenian
Serbian
Lithuanian
Latvian
Estonian
Tri-Ped's website says that the feet are weighted to prevent blow-over in windy conditions.
Posted : June 19, 2016 10:06 am
Translate
▼
English
Spanish
French
German
Italian
Portuguese
Russian
Chinese
Japanese
Korean
Arabic
Hindi
Dutch
Polish
Turkish
Vietnamese
Thai
Swedish
Danish
Finnish
Norwegian
Czech
Hungarian
Romanian
Greek
Hebrew
Indonesian
Malay
Ukrainian
Bulgarian
Croatian
Slovak
Slovenian
Serbian
Lithuanian
Latvian
Estonian
I would still like the option to bolt to the ground, another improvement would be magnet inserts for working on iron plating.
Posted : June 19, 2016 10:36 am

Translate
▼
English
Spanish
French
German
Italian
Portuguese
Russian
Chinese
Japanese
Korean
Arabic
Hindi
Dutch
Polish
Turkish
Vietnamese
Thai
Swedish
Danish
Finnish
Norwegian
Czech
Hungarian
Romanian
Greek
Hebrew
Indonesian
Malay
Ukrainian
Bulgarian
Croatian
Slovak
Slovenian
Serbian
Lithuanian
Latvian
Estonian
wilba, post: 378137, member: 9024 wrote: Following the interesting thread "Internal building surveying"
I have also read suggestions here (but they might not be so relevant to us)...
http://www.largeformatphotography.info/forum/archive/index.php/t-115313.htmlRe Tri-Ped
http://www.tri-pedcorp.com/
I like the fact you strap them round the tripod legs to stop lifting. How much do they weigh each?
What do they look like on the underside?
Im travelling, so cant go see what they weigh, I can say you feel it when you carry them very far.
They are great for concrete and carpet.
Been very happy with them,.
Posted : June 19, 2016 1:02 pm

Translate
▼
English
Spanish
French
German
Italian
Portuguese
Russian
Chinese
Japanese
Korean
Arabic
Hindi
Dutch
Polish
Turkish
Vietnamese
Thai
Swedish
Danish
Finnish
Norwegian
Czech
Hungarian
Romanian
Greek
Hebrew
Indonesian
Malay
Ukrainian
Bulgarian
Croatian
Slovak
Slovenian
Serbian
Lithuanian
Latvian
Estonian
I use one of these. Very useful
http://www.tigersupplies.com/Products/Nedo-Tripod-Floor-Mount-Stabilizer__NED665111.aspx&apos ;">Tripod Star
Posted : June 19, 2016 2:06 pm
Topic starter
Translate
▼
English
Spanish
French
German
Italian
Portuguese
Russian
Chinese
Japanese
Korean
Arabic
Hindi
Dutch
Polish
Turkish
Vietnamese
Thai
Swedish
Danish
Finnish
Norwegian
Czech
Hungarian
Romanian
Greek
Hebrew
Indonesian
Malay
Ukrainian
Bulgarian
Croatian
Slovak
Slovenian
Serbian
Lithuanian
Latvian
Estonian
Thanks for your replies.
I had some of this...

https://www.dycem-ns.com/dycemshop/product/non-slip-reel/
and i have used impact adhesive to glue it to some chunks of 18mm plywood. No sign at all of slipping on my epoxy garage floor.
chris mills, post: 378241, member: 6244 wrote: As promised, views of a tripod support I made (four in total so that traversing can be carried out on smooth surfaces).
The pads are from plywood, 12mm. thick and about 9cm x 6cm. The leg hole was drilled at 12mm, but stopped JUST as the point of the drill broke through, so there is a nice tapered socket for the leg point to sit in. The bottom is 3mm. neoprene sheet, stuck on with a rubber contact adhesive. Chains are galvanised from the local do-it-yourself store. The neoprene will slide easily if the weight is taken off, but grips very well once the load goes back on. this makes it easy to adjust the tripod position for centring but ensures it stays put when observing. They were made about 10 years ago, so have had plenty of use and no problems.
I suppose if you wanted to produce a really class job you would drill the legholes on a rake to match the tripod legs.
I have bought some chain and a hoop to try out the above.
As another thought i am going to form some concrete or lead weights, with the above non slip material, stuck to the bottom and something to hold the tripod feet down.
Posted : June 20, 2016 2:05 pm

Translate
▼
English
Spanish
French
German
Italian
Portuguese
Russian
Chinese
Japanese
Korean
Arabic
Hindi
Dutch
Polish
Turkish
Vietnamese
Thai
Swedish
Danish
Finnish
Norwegian
Czech
Hungarian
Romanian
Greek
Hebrew
Indonesian
Malay
Ukrainian
Bulgarian
Croatian
Slovak
Slovenian
Serbian
Lithuanian
Latvian
Estonian
We don't set up on smooth surfaces a lot, but when we do it's typically sidewalks and I set the legs up, figure out where the points are going to be, move them and pop a small hole in the concrete with a hammer and 60d nail. Then, I use the adjustment screws and legs to get it over the point.
Posted : June 20, 2016 2:26 pm