A Set For Kent ?
Per DIN 18723
2 pointings = 1 BSD + 1 FSD = 1 angle observation
2 angle observations = 1 BSD + 1 FSD + 1 BSR + 1 FSR = 1 angle measurement
2 angle measurements = 1 set.
A single observation of an angle can never be a measurement.
Paul in PA
A Set For Kent ?
> Per DIN 18723
>
> 2 pointings = 1 observation
>
> 2 observations = 1 angle measurement
>
> 2 angle measurements = 1 set.
>
> A single observation of an angle can never be a measurement.
Paul, would you quote what the actual spec says? That definition of a set you suggest is obviously not the definition that is used either in the English language or, apparently, the German surveying literature. It wasn't in English translations of the various drafts of the DIN angular spec that I've read, notably that of Professor Hirsch. So it's reasonable to think that you've misunderstood what the language actually says.
DIN 18723
Okay, I went through my library and found the copies I have of various versions of DIN 18723, a general specification that covers electro-optical distance meters and levels as well as the angular accuracy of geodetic instruments (theodolites and total stations).
The earliest version of the angular accuracy spec for DIN 18723 that I have is dated May, 1975 and is in the form of a proposal made by a Professor Hirsch, a translation from the original German.
In that proposal for DIN 18723, it is explicit that what is being tested is the standard error of a direction taken as the mean of FL and FR pointings. The basic measurements from which this test is made are that directions are taken on one face of the instrument to four targets and then the instrument telescope is reversed and the directions to the same four targets are taken on the opposite face of the instrument.
The circle is advanced and the procedure is repeated.
In all directions to the four targets are taken in four different circle positions.
Then the direction angles of each measurement set (same zero or circle setting) are reduced so that the directions to the first target are 0°00'00" and statistical analysis is performed to compute the standard error of a single direction angle (mean of FL and FR pointings).
Assuming a 5" instrument. In order to achieve 5" precision one needs to turn 2 sets of angles, or 4 angle observations. E = precision.
E = ( 2 x E(din) ) / SQRT (n)
5" = ( 2 x 5" ) / SQRT (4) = ( 2 x 5" ) / 2 = 5"
In order to get 4 angle observations you need to take 2 Direct observations and 2 Reverse observation, 2D & 2R, remembering it takes 2 sightings (BS & FS) to make 1 observations.
In order to achieve a 5" precision angle with a 5" DIN spec gun one needs to make 8 sightings (pointings).
Paul in PA
ISO TC 172/6/2 N3E
By September of 1983, WG 2, chaired by Dr. F.K. Brunner of Wild Heerbrugg, Ltd. had produced an accuracy test for theodolites.
As with the DIN test procedure, the basic observing method was the obvious one. Direction sets to six targets are to be taken with an instrument in each of three circle positions (advancing the circle setting on the first target for each set) by two different observers. That gives a total of six full arcs or direction sets to the six targets, meaning 36 different directions as the mean of FL and FR.
As before, a direction was taken as the mean of two pointings, one FL and one FR to a target. The object of the test was to characterize the standard error of such a direction by statistical methods.
So, the Wild Heerbrugg version of the ISO spec was quite similar to the provisions of DIN, differing mainly in sample size to give better statistical confidence in the standard error of a direction.
Where does a geodimeter robot fit into this din spec
or any robot after the robot does a average on both faces to store corrections.
Then one "the robot" sights point one and does a 5 reading average one face then point two and does another 5 readings on one face.
The spec is out of date.
After 10 years of one sec robot it takes about one face 5 readings DBAR geodimeter speak before the average angle position one readings do not really change much of any substance.
What air quality conditions are din spec performed under
5 Readings Does Not Equal 5 Pointings
It does not move off the prism and recenter, then when it reverses the scope it kinda cheats on the centering relying on a calculated position that it accepts as long as it can get a distance measurement. What you are seeing is repeatability but not necessarily precision but it works for most.
DIN 18723 was not designed for robots but the ISO spec they replaced it with is a joke.
Paul in PA
Okay, I'll translate what I think that Paul is trying to say:
> Assuming a 5" instrument. In order to achieve 5" precision one needs to turn 2 sets of angles, or 4 angle observations. E = precision.
Translation: If you have an instrument that can measure directions (taken as the mean of FL and FR) with a standard error of 5". then you'll need to measure an angle twice (a measurement consisting of subtracting the directions to two targets) in order to end up with an estimate of the angle with a standard error of 5".
> E = ( 2 x E(din) ) / SQRT (n)
Generally, if E(dir) is the standard error of a direction taken as the mean of FL and FR circle readings, then the standard error of an angle E(ang) taken as the mean computed from n sets of directions (a set consisting of directions FL and FR to both the BS and FS targets) will be thus:
E(ang) = [1.414 x E(dir)]/ SQRT(n)
> 5" = ( 2 x 5" ) / SQRT (4) = ( 2 x 5" ) / 2 = 5"
So, in the case of an instrument that gives directions taken as the mean of FL and FR circle readings with a standard error of 5", where the angle is measured twice, the standard error would be:
(1.414 x 5") / SQRT(2) = 5"
> In order to get 4 angle observations you need to take 2 Direct observations and 2 Reverse observation, 2D & 2R, remembering it takes 2 sightings (BS & FS) to make 1 observations.
Translation: In order to measure an angle, one needs two sets of directions FL and FR or a total of four pointings.
> In order to achieve a 5" precision angle with a 5" DIN spec gun one needs to make 8 sightings (pointings).
Translation: Since an angle must be measured twice to get a result with a standard error nominally equal to the standard error of a direction (mean of FL and FR), that will require taking four directions (mean of FL and FR for each) or eight different pointings.
5 Readings Does Not Equal 5 Pointings
The pointings today mostly remove a poor tripod maybe some air quality issues
When in dbar the servos are working to chase the Diode and with electronics the
first reading is actually ten plate readings presented as one reading of five.
The servos in the robot as they work "noisy" so to speak in poor air was is my main indicator about how the air is going to affect to survey
B89.4.19 - 2006 Performance Evaluation of Laser-Based Spherical Coordinate Measurement Systems is a specification written by NIST that some, in this discussion, may find interesting.
> Where does a geodimeter robot fit into this din spec
> or any robot after the robot does a average on both faces to store corrections.
>
> Then one "the robot" sights point one and does a 5 reading average one face then point two and does another 5 readings on one face.
>
> The spec is out of date.
>
> After 10 years of one sec robot it takes about one face 5 readings DBAR geodimeter speak before the average angle position one readings do not really change much of any substance.
>
> What air quality conditions are din spec performed under
Peter, the heart of the DIN spec for horizontal angle accuracy is the statistical analysis. The whole point of the spec is to get a useful estimate of the standard error of a direction taken with the instrument as it would actually be used. The DIN spec originated at a time when surveying instrument design was not as advanced as it is today. A test procedure on an instrument with dual axis compensation, collimation correction, and multiple circle scanners, should reflect how the instrument would actually be used with the object of estimating the contributions of any errors in the internal software corrections made by the instrument to the final measurements output.
Seeing and atmospheric turbulence aren't part of the DIN test except that it was intended to be done under good conditions in order to evaluate the expected performance of the instrument under those conditions, not the degradation of the performance under bad conditions.
Kent ?
A DIN specs 5" instrument is not exactly precise to 5" per pointing. If it were your use of 1.414 x E would be correct.
A DIN specs 5" instrument satisfies the conditions of the formula
E = ( 2 x E(din) ) / SQRT (n)
5" = ( 2 x 5" ) / SQRT (4) = ( 2 x 5" ) / 2 = 5"
The DIN specs call for 2 in the numnerator not the satistical probability of 2 pointings.
2 is what is found in the textbooks I have.
When it comes to statistical analysis even Statistics Texts can disagree on the establishment of formulae.
Paul in PA
Kent ?
> A DIN specs 5" instrument is not exactly precise to 5" per pointing. If it were your use of 1.414 x E would be correct.
Paul, I'm afraid that you're obviously wrong if you're maintaining that the DIN specs do not explicitly deal with the standard error of a direction taken as the mean of pointings FL and FR. What is the source for your contention otherwise?
Kent ?
I questioned your source of the 1.414 in the numerator of the equation. I have always seen it as 2.
DIN specs is a results test system not an absolute equipment evaluation.
The problem is that DIN specs are not something one can pull up on the internet, since at that time they required one to purchase same and as of now are not available being replaced by the ISO garbage. Which I in fact purchased and felt robbed afterwards because they are not in fact specifications at all. Somehwere around here I believe I do have a copy but all I have come up with is references to certain parts but not the full text. This is an argument regarding interpretation of specific words that are not available to view. Then again if I did have the specs and published them here I could be subject to severe financial penalties.
Paul in PA
Kent ?
> I questioned your source of the 1.414 in the numerator of the equation. I have always seen it as 2.
>
Well, suppose, as is usually the case, that the angle calculated from two directions is a simple subtraction of two directions (mean of FL and FR) each with a standard error, s. By elementary statistical analysis, the subtraction produces a quantity with standard error, [SQRT(2)]s, not 2s.
Kent ?
Of course, the more general case is that the standard error, [tex]s[/tex], of the sum of n quantities, each with standard errors, s1, s2, ... sn, isn't ([tex]s1 + s2 + ... +sn)[/tex]. It's [tex]SQRT(s1^2 + s2^2 + ... +sn^2)[/tex].
Kent ?
As I said DIN 18723 defines the formula with 2 not 1.414.
If you do not use the DIN formula you cannot say you meet DIN specs.
There must be more going on in there creation of said formula than appears obvious.
Paul in PA
Kent ?
> As I said DIN 18723 defines the formula with 2 not 1.414.
Sorry, but I'm afraid you've imagined that part. It's not possible.
Scott Zelenak, post: 29064, member: 327 wrote: Occaisionally, I have the 'opportunity' to explain these standards to other surveyors. I often ask other surveyors what their "confidence level" is in their results. The answer of "110 %" is guaranteed to elicit giggles.
There are some pretty common misconceptions involving the expected precision of an angle turning. Even I misunderstood some of the concepts, so I have tried to condense and codify what I think I know.
It is quite a few years since I have had the chance to read the DIN specs and I have only briefly had an encounter with the new ISO specs.
Terminology is quite important in the specs and is not interchangeable; one of the commonest errors made in these discussions.
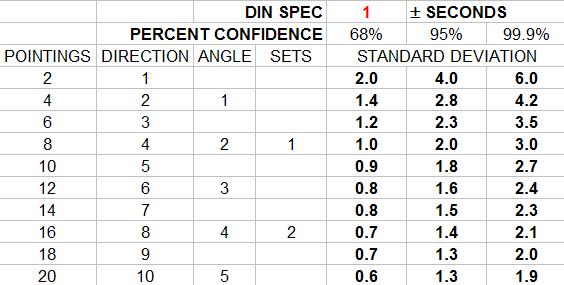
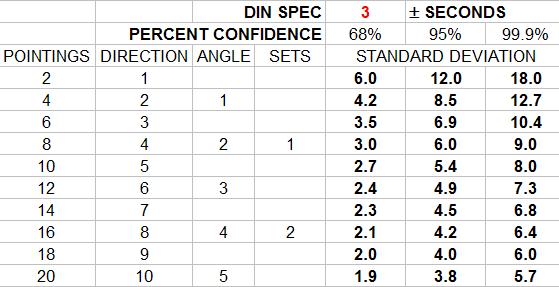
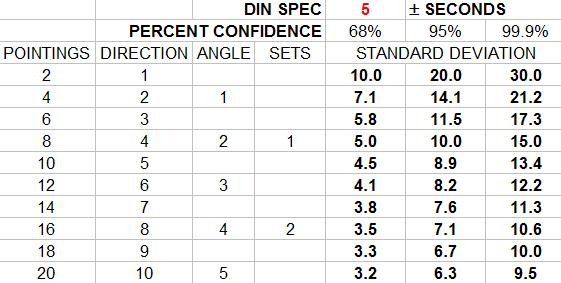
Hopefully, I will get this right...A pointing is one sighting of one target. Two pointings, one at the BS and one at the FS is a direction. Two directions, one in each face, is an angle. Two angles is a set or one repetition.
The DIN 18723 spec is not the accuracy of an angle. It is the uncertainty in pointing face direct and pointing face reverse at one target. This standard deviation is merely an expression of precision.
In order to apply the DIN spec to an angle one has to multiply the standard deviation by 2 then divide by the square root of the number of directions.
One must also remember that these results represent the standard deviation of 68 % confidence. In order to estimate the values of 95 % or 99.9 % confidence the appropriate multipliers are required.
These values then equate to optimal procedures, equipment and conditions. Poor pointing techniques, weak tripods, and sun shimmer quickly degrade results. For example, pointing to the apparent prism center rather than a manufacturer provided target can cause ??prism confusion?, where the center of the apparent prism is, in effect, a mirage, displaced due to poor alignment of the prism to the instrument. Only after systematic biases are understood and compensated for might possibly standard deviation be a representation of accuracy.
The new ISO 12857 Part 2 standard created a new means of determining Theodolite accuracy. A test series of 5 targets spaced around the horizon evenly at distances from 100 to 250 meters are observed in four series of observations. Each observation comprises three sets of directions to each target. A least squares adjustment then determines the experimental standard deviation of a direction observed in both faces.
This standard has been revised and replaced by ISO 17123-3:2001 (which I have not had the pleasure to view).In order to keep all this straight I made an excel sheet;
I have made an honest attempt at correctness here, so, of course, if somehow I have misspoken I am assured someone will kindly correct me.
One note, the math is done by the excel sheet, so...
Hi Scott
I am trying to understand the DIN 18723 spec and your post was very helpful.
( https://surveyorconnect.com/community/threads/understanding-din-specs.29064/ )
The issue I have is understanding the terminology for example you have stated in your post " A pointing is one sighting of one target. Two pointings, one at the BS and one at the FS is a direction. Two directions, one in each face, is an angle. Two angles is a set or one repetition."
I was hoping to clarify this statement a little, with responses made by other people in the forum. In your opinion would you agree that:-
A pointing is one sighting of one target = A pointing comprises a single intersection of an object and the reading of the
circle.
Two pointings, one at the BS and one at the FS is a direction. = 2 pointings = 1 BSD + 1 FSD = 1 angle observation
Two directions, one in each face, is an angle. = 2 angle observations = 1 BSD + 1 FSD + 1 BSR + 1 FSR = 1 angle measurement
Two angles is a set or one repetition. = 2 angle measurements = 1 set = (1 BSD , 1 FSD) + (1 BSR , 1 FSR) + (1 BSD,
1 FSD) + (1 BSR , 1 FSR)
The reason why I am asking this question is because it helps me understand how the observations collected in the field relate to the terms you have used in your post. (by the way I have tried to find other posts that also define the same terms but in a slightly way but they are not my posts but help me understand the terms).
Your thoughts?
P.L.Parsons, post: 29071, member: 72 wrote: I've always considered a set as BSD, FSD, FSR, BSR.
That's the way I use the term (almost -- I use BSD, BSR, FSD, FSR), regardless of what DIN or anyone else says. And for most boundary work I only turn 1 set.


