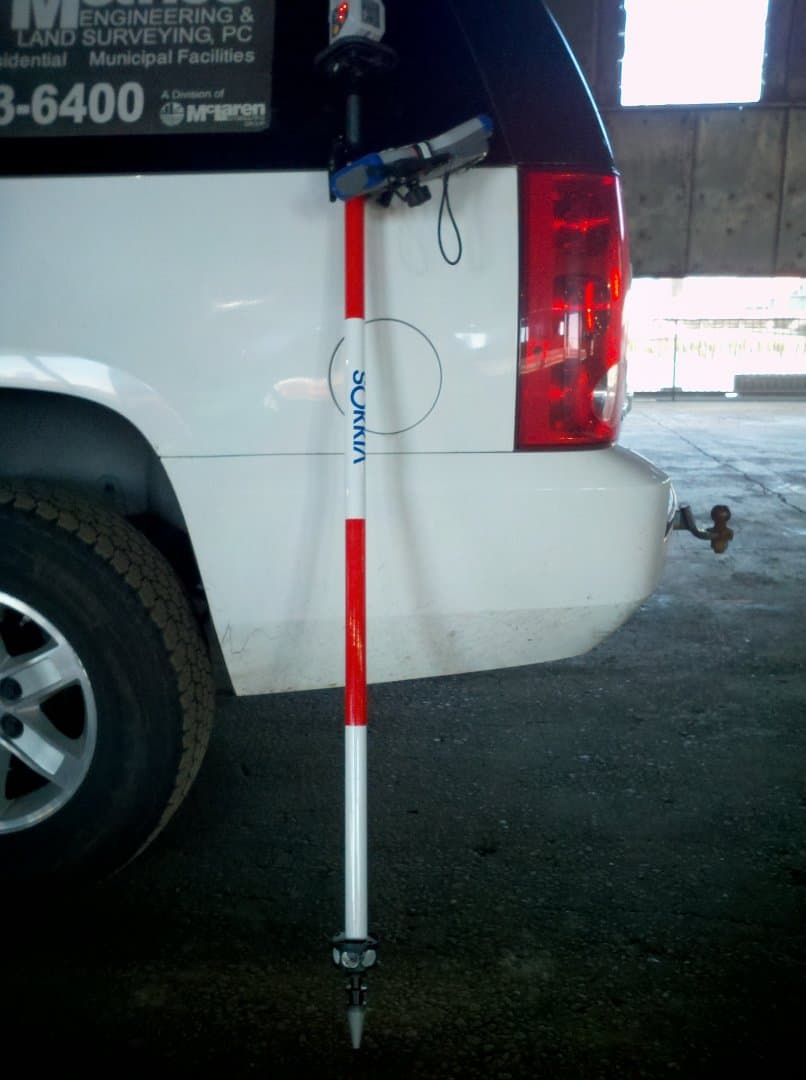
Solo work is a fact of life for many of us on all projects, including layout work. Put this together with a old Topcon prism, use it for higher accuracy layout, not rough site stuff. It is actually faster than the prism up top because there is so much less movement @ the prism.
:gammon:
Looking good. How did you managed to attached your prism? Is there an adapter for it? Or your topo shoe fitted in with 5/8 threading?
Just be careful of the torque on the prism from the pole. Otherwise wicked cool.
I have for my Topcon DS a Seco 170mm Pole, AdirPro 445mm and a 300mm extension to use between the two as required.
Typically use the Seco for fine work or levels on pins and Pegs and the AdirPro for everything else - I only do what you would call construction staking.
Well you don't have to worry that the pole is bent. :stakeout:
That's awesome. I'll be rigging up one of those.
Thanks for sharing.
sireath, post: 365823, member: 9370 wrote: Looking good. How did you managed to attached your prism? Is there an adapter for it? Or your topo shoe fitted in with 5/8 threading?
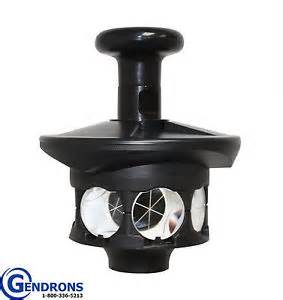
That prism is the the same on that comes with a Focus30, a 'generic' 2mm, see below. I said it was a Topcon prism, it actually just came with a Topcon. It has female threads on each side, the black shaft coming out of the bottom has male on each end. There is a hood & sleeve that went over it & then a knob with a plumb bubble screwed on to that. The rod tip is an old style with the replaceable plumb bob tip, great for fine marking on tight layouts.
Luke J. Crawford, post: 365787, member: 11382 wrote: Solo work is a fact of life for many of us on all projects, including layout work. Put this together with a old Topcon prism, use it for higher accuracy layout, not rough site stuff. It is actually faster than the prism up top because there is so much less movement @ the prism.
I've thought about doing that several times, but I've never actually done it. I'm glad to hear that you like it. Maybe I will get around to making one.
I do this all the time with a little peanut prism, but doesn't that 360 cost about $1k?
When you add that to the 360 mounted on top that I need to hold the RC-4R unit (I bought it from the Jawas) and the data collector, etc., pretty soon the rod is worth more than the robot!
Gromaticus, post: 365969, member: 597 wrote: I do this all the time with a little peanut prism, but doesn't that 360 cost about $1k?
When you add that to the 360 mounted on top that I need to hold the RC-4R unit (I bought it from the Jawas) and the data collector, etc., pretty soon the rod is worth more than the robot!
That prism on the bottom was an extra that came with a now 'paper weight' Topcon GTP-8-2 robot. Thee is just a bayonet adapter on the bottom of the RC-5 to lock into the rod quick connect. The APT1 360 ($1,500) stays in the case when running this way, the cost of the ATP! is why it isn't mounted @ the bottom. That rod is aluminum, Carlson Surveyor2 is very light for the size, even with the RS it weighs less than the Ranger3 on a 8' SECO carbon fiber that we run with our Focus30.
I use one of the old Geodimeter "brick" prisms like that with my S6 if I have something critical where the instrument can see the ground.
I also do it with the peanut prism (Leica mini prism). Setting the rod up with a prism at 100mm; 400mm and 700mm makes it much easier to do as-builts in areas where things are in line of sight at different areas (scaffolding, props, or other stuff that keeps on being in the way). Much quicker than having to wait for the assistant to move the prism up to another height. Just pop the gun up and away you go.
Only concern has been that the prism constant (-17mm) ins't always perfect ( found the 5 we own to vary between -14mm and -18mm at 80m). No damage so not sure where that came in. These were checked using Trimble S3 (2" with 2mm EDM), S6 and S5 (2" with 1mm EDM). But bolts with 5mm tolerance seemed fine at the time
dirkie2710, post: 366001, member: 10950 wrote: I also do it with the peanut prism (Leica mini prism). Setting the rod up with a prism at 100mm; 400mm and 700mm makes it much easier to do as-builts in areas where things are in line of sight at different areas (scaffolding, props, or other stuff that keeps on being in the way). Much quicker than having to wait for the assistant to move the prism up to another height. Just pop the gun up and away you go.
Only concern has been that the prism constant (-17mm) ins't always perfect ( found the 5 we own to vary between -14mm and -18mm at 80m). No damage so not sure where that came in. These were checked using Trimble S3 (2" with 2mm EDM), S6 and S5 (2" with 1mm EDM). But bolts with 5mm tolerance seemed fine at the time
I use this when I have an I-man. -30MM top & bottom, lower prism has a bubble on it as well. Indispensable for tolerance work in high-rises when the safety nets are in place, we can go over or under the cables. Using the lower one is the equal of a good traverse kit regarding accuracy, has all but replaced my plumb bob.


