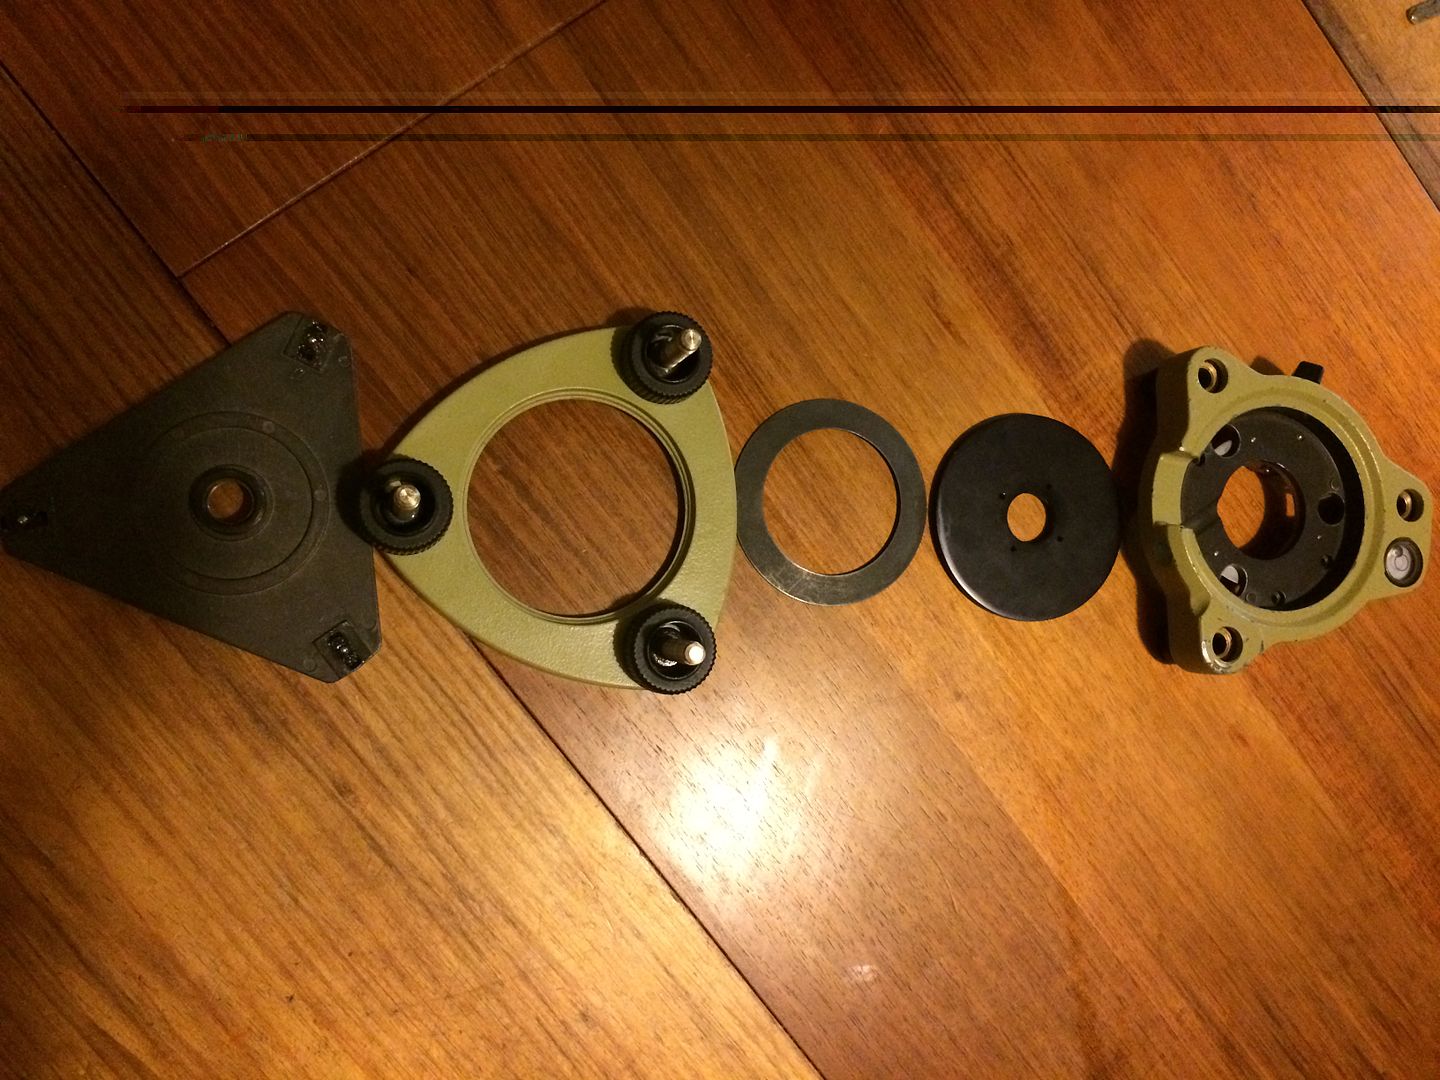
Well I've got a bit of time at home to try and tidy up. Will hopefully find a few lost bits and a few that I forgotten I had. And mostly just be able to get into my little home office again...
A couple of months ago one of my tribrachs came back in two pieces in the hands one of our talented "apprentices". I have no idea how he managed it and now I cannot see how the two pieces were ever attached. Are they just glued or pressed together?
I still have the three little plastic channels that go under the footscrew pegs
It's OK I got it.
Those 4 little holes are for turning the top plate from above (with circlip pliers). There is a very short thread that holds the top and bottom plate together.
I forgot to show in the photo as well there is a washer shaped spring that sits between the two to spring load it.
hello squowse,
start from the left. each piece goes on top of the piece immediately to it's left. piece 4 will thread into/onto piece 1 to hold pieces 1 to 4 together. piece 3 is a diaphragm spring.

edit: just saw your post. good going.
Conrad, post: 350387, member: 6642 wrote: hello squowse,
start from the left. each piece goes on top of the piece immediately to it's left. piece 4 will thread into/onto piece 1 to hold pieces 1 to 4 together. piece 3 is a diaphragm spring.
edit: just saw your post. good going.
brilliant, hope you didn't take that apart just for me!
I'm sure it will help someone else.
the pieces 1 to 5 are numbered left to right?
how does piece 5 fix? are there circlips involved under the plastic covers?
squowse, post: 350392, member: 7109 wrote: brilliant, hope you didn't take that apart just for me!
I'm sure it will help someone else.
the pieces 1 to 5 are numbered left to right?
how does piece 5 fix? are there circlips involved under the plastic covers?
yeah i did, no biggie though.
yes numbered 1 to 5, left to right.
yep, circlips are involved to allow the threads from 2 to come away from 5. when in place they determine the maximum amount you can wind the footscrews out.
Conrad, post: 350476, member: 6642 wrote: yeah i did, no biggie though.
yes numbered 1 to 5, left to right.
yep, circlips are involved to allow the threads from 2 to come away from 5. when in place they determine the maximum amount you can wind the footscrews out.
Put this back together slightly wrongly when I did it over xmas.
I thought I would leave a few notes in case anyone else has the same problem.
a) Piece 1 has the threaded insert fixed to it. Mine had come loose ( I think there was threadlocker there before) so I used a couple of spots of superglue to hold it back in. When mine was broken, this threaded insert was attached to piece 4 only. I think when the tripod screw was (over)tightened it loosened this insert gradually.
b) Piece 3 goes in on top of piece 2 with the spring concave side downwards. It just about fits into a groove / ledge in piece 2. I was putting it inbetween piece 1 and 2 before and it will not allow piece 1 and 2 to be clamped together properly in this position although it seemed OK at first.
c) I used circlip pliers to grip and tighten piece 4 down after turning it by hand for most of the thread.
d) I didn't need to separate pieces 2 and 5. Pieces 3 and 4 will just fit through the gaps between the footscrews.


