Hi guys,
I know this has been discussed ( https://surveyorconnect.com/community/threads/rim-inverts.252130/ ) and I followed that thread, but I don't want to create this for C3D as not everyone in my office has C3D.
What I would like to create is a simple (I hope it is) LISP routine that does the following :
In the field we would open all the manhole and then survey both the Lidlevel and Invert Level. The Pipe diameter, inlet direction, outlet direction would either be noted in fieldsketch book, or by annotating photos in the field.
Typical CSV file of those 2 points would like this :
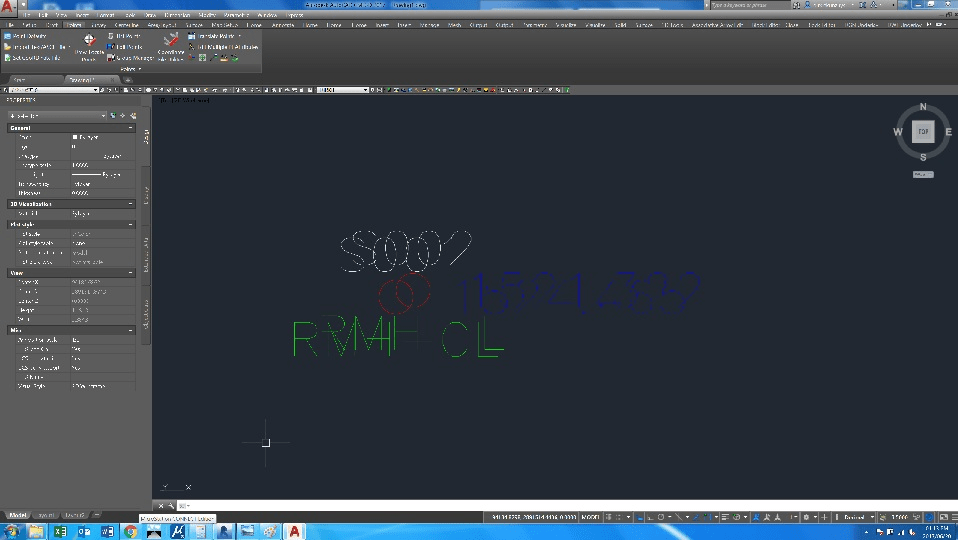
S001, 94185.214, 2891514.874, 1524.465, RMH-CL
S002, 94185.264, 2891514.894, 1521.322, RMH-IL
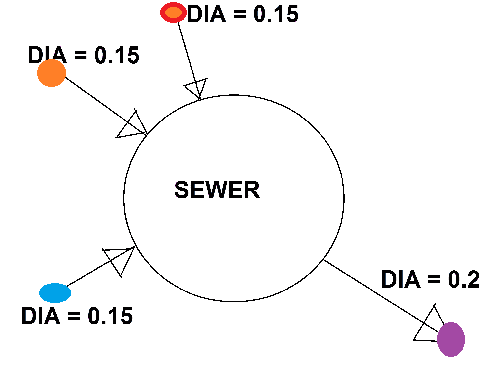
The fielsketch would look something like this :
I import my points using Carlson, and would run it through F2F and getting LL and IL is easy enough but not exactly what I need to happen.
All my Manhole points (SMHxx,RMHxx, etc) goes into a point group and I display only that point group
At this stage I am only seeing points relating to manhole information.
I want to be able to run a LISP then click on a the LL point and want to have a dialog or similar appear and ask me for the following information regarding that manhole:
1. Define text and arrow head size (Must be equal at this stage to make it easier)
2a. The point that is the IL (IL survey point must be clicked) OR
2b. If no IL could/was surveyed the dip height must be typed in
If 2a is selected the LL , IL and depth (dip height) must be written to text only after question 11 has been answered
If 2b is selected the LL , IL (subtract dip height from LL) and dip height must be written to text only after question 11 has been answered
3. How many pipes flow into the manhole (Type that data)
4. How many pipes flow out of the manhole (Type that data)
5. For number of pipes entered at question 3 there must be asked for each pipe the diameter. Example if "3" was entered
- Pipe diameter of Inlet Pipe 1 (Type in value) (Pipe at RED DOT in image)
- Pipe diameter of Inlet Pipe 2 (Type in value) (Pipe at ORANGE DOT in image)
- Pipe diameter of Inlet Pipe 2 (Type in value) (Pipe at BLUE DOT in image)
6. For number of pipes entered at question 4 there must be asked for each pipe the diameter. Example if "1" was entered
- Pipe diameter of Outlet Pipe 1 (Type in value) (Pipe at PURPLE DOT in image)
7. For each pipe in question 3, a starting point needs to be indicated from where the pipe is flowing from. The direction needs to be calculated from the point clicked to the point selected in the original command (From pipe - manhole LL). In fieldsketch above from RED DOT to RMH LL. An arrow should then be drawn in that direction, but the arrow tip should be where the RED DOT is. Not from RED DOT to RMH LL (otherwise no space for MH symbol/they will overlap)
8. For each pipe in question 4, an ending point needs to be indicated from where the pipe is flowing towards. The direction needs to be calculated from the point selected in the original command to the point clicked (From manhole LL - pipe). In fieldsketch above from RMH LL to PURPLE DOT. An arrow should then be drawn in that direction, but the arrow tail should be where the PURPLE DOT is. (otherwise no space for MH symbol/they will overlap).
9. For each pipe defined in question 3, the location of the "Pipe Diameter = xxxx" must be indicated by clicking on screen and text placed there.
10. For each pipe defined in question 4, the location of the "Pipe diameter = xxxx" must be indicated by clicking on the screen and text placed there.
11. The type of manhole (SEWER, CABLE, STORMWATER, etc etc) must be selected from dropdown list, or the option to type another one in should be available (BLOCKED etc etc) and location for text must be defined
I think that is what would be the ideal LISP. There might be some adjustments that are needed to make it better (like the "Pipe diameter = xxxx" should be written in the same direction as the arrow is pointing, the text should be placed in layer "manhole details" etc)
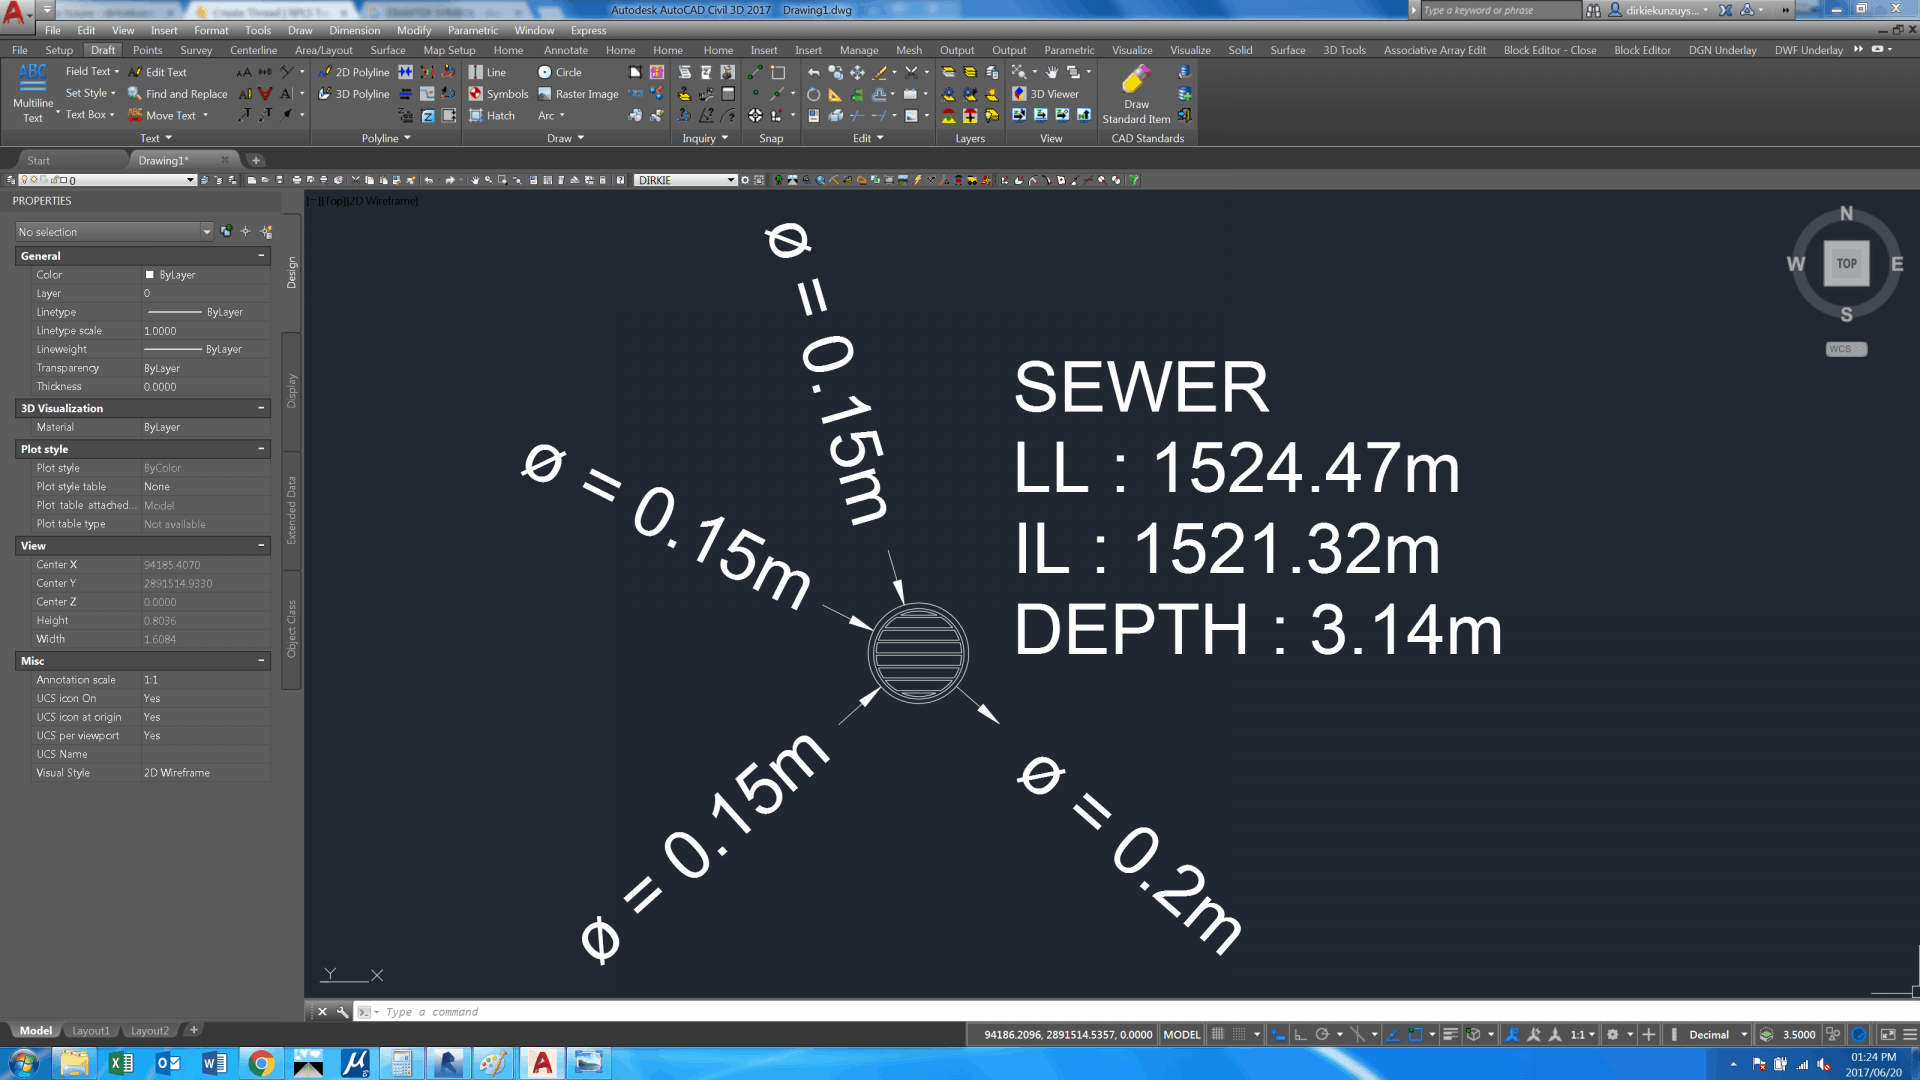
I have also attached an image of what I think the final product should look like.
If someone could help me get started on something like this or already has something to this effect I would be immensely grateful. I have programming knowledge in Java, C++,VBA and Delphi, but it is nearly 10 years ago and I was a beginner.
FINAL PRODUCT :
Thank you guys
Dirk Uys
christ lambrecht, post: 433458, member: 284 wrote: We use a VBA routine with a userform to place the different levels for cover and inverts.
Inverts are noted on paper or in dc.
x..z are downstream (out)
a.. are upstream (in)
Let me know if you need the code as example.
this works (only) with the layers in our template.
Hi Chris
If you would be willing to send me that I would really appreciate it.
Thanks so much
Dirk
Sent from my SM-N920C using Tapatalk
Also very interested in this routine Christof.
Beuckie,
found 2 mail adresses, one of them must be right!
We-transfer link sent.
groeten uit Gent.
Hi Chris or anyone with the skills needed
I have looked at what you had and have decided to create a new program based on yours.
I am however struggling with 2 things.
I am running Acad 2017 with Carlson 2017, so the program will make use of some commands from Carlson (only 1 so far).
1 such command is the "Draw Arrow Head" command (Arrowhd)
Basically the program needs to be operated as follows :
1. Type scale in first box (something between 0.1 and 0.2 would be good, but would be different for guys wokring in feet)
2. 2-steps required - Select the manhole Lidlevel survey point (Button by "Manhole Lidlevel....") - Must select an Autocad point entity (Node etc)
- Click where the centre of the manhole is (Best is to use snapping mode and select "Node") (This is used in calculating the lines that indicate flow. I don't know how to do it other than this so its done like this now)
3. Select the manhole Invert level survey point(Button by "Manhole Invert Level....") - Must select an Autocad point entity (Node etc) (If this point was not surveyed then it's fine,just skip this step, but then tape height must be entered in next step)
4. If Invert level point was surveyed, then just press calculate and tape height will be calculated. If not then please type tape height and then press calculate. Invert Level will then be calculated. this is there to check fieldsketch for height to be accurate
5. Select amount of inlet pipes (No screen activity yet)
6. Select amount of outlet pipes (No screen activity yet)
7. For each number of pipes is question 5,you can enter the tape heights (No screen activity yet)
8. For each number of pipes in question 6,you can enter the tape heights (No screen activity yet)
9. For each number of pipes is question 5,you can enter the pipe diameter (No screen activity yet)
10. For each number of pipes is question 6,you can enter the pipe diameter (No screen activity yet)
11. For each pipe in question 5, you can click a button that will draw the flow direction of the inlet pipe
Currently this is where I have some problems.
The program will draw a circle 0.3m in radius. You must preferably select a point on the radius of that circle
that represents the approximate direction from where the pipe flows. The circle is there as a reference just so the point being clicked is always at the same distance from the center.
The program will then draw a line from your selected point, to the MH centre, then rotate the line 90?ø from your selected point. This line indicates the flow direction. Based on the scale entered in Q1, tt must then start Carlson's "Arrowhd" command and draw an arrow head pointing towards the MH centre. This is where my problem comes in. I can have the program understand the "Scale" and have it be part of the command, but I can't get it to use the line that was just drawn as the line to draw the arrowhead on.
Could someone please help me with that. Secondly if anyone could help me with the double click that is needed in Q2, so that it only needs the 1st step that would be great. Then I feel I need to probably state this also : This is freeware,shareware or whatever the correct term is. Whoever wants to use or modify this or use it for their personal or commercial gain is free to do so. I know this isn't the best programming skills in the world, but I want to share with everyone who might find it useful.
I have attached the project.dvb file
I hope someone would be able to help me out or have any suggestions or comments that would be great. Once this is done I will try and make it into its own little button command in acad
Thanks
Dirk from South Africa
Hi Dirk,
I'm on AcadMap 2016 and can open the dvb file but get an error when I want to display the userform. Do you have a screen shot?
I'll have a look at it ...
check the autodesk forum for help on VBA, the experts are there.
Christof.
christ lambrecht, post: 434208, member: 284 wrote: Hi Dirk,
I'm on AcadMap 2016 and can open the dvb file but get an error when I want to display the userform. Do you have a screen shot?
I'll have a look at it ...
check the autodesk forum for help on VBA, the experts are there.
Christof.
Hi Chris
Will do so shortly. I have changed the form quite a bit yesterday so will make my last bit of changes this morning,then upload a new version
Regards
Sent from my SM-N920C using Tapatalk
Hi guys,
ok so I have updated the program. There are 2 versions :
- for people with Carlson
- for people without Carlson
Also attached is an image of what the form will look like
load as you do any other macro and select which one you need (carlson with or carlson without)
Use as you like 🙂
Let me know what you think and what can be changed. There is very little redundancy or false/error clicking built in so click carefully
Enjoy and hope it helps someone
Dirk
Hi guys,
Ok I am back again.
Sorry for posting the same thing over and over again, but want to share. I think I am finished (will probably say that a lot), but I am tired now so will leave it until it seems to be broken. I have uploaded a new version, and also is some photos and a 'how to install' guide
When using the program, note the command line dialogs, this will guide you in how to use the thing.
Basically just work top to bottom. If you have a stormwater or sewer, you can either click a surveyed invert level point, or type in the depth (but not both. Later I will maybe change it so that if you have both the one is a check one the other). I put the depth option first as I think that's how most people do it. After typing the invert depth, remember to click calculate. This will then calc the IL. If not you will not have a IL written to CAD
My suggestion would be to run this very late in the drafting process, once paperspace scale and the like have been set up, so you can select the scale correct.
It is design to write the arrowheads and the text at 2.5mm relative to the scale in paperspace.
This is currently solely written with metric in mind, so guys working in Feet will have to work out the best size for themselves at this stage or modify my .dvb file
Cable, Blocked or Unable to open Manhole types have no pipe details.
Once again please fiddle with this and give me some feedback so I can change it. The next updates I will load onto my dropbox account and share a link here as well so I don't pollute RPLS too much
Dirk
Hi guys,
So I discovered that square manholes have not been considered so looks odd at square MHs. In due course I will amend this when I get a few days again.
Anyway has anyone used it and is there any suggestions so far?
Thanks guys
Dirk
Sent from my SM-N920C using Tapatalk


